Kingston TurboChip 486-133 Fan Replacement
This page documents one way of replacing the fan on a Kingston TurboChip 486 133MHz 486 upgrade processor.
WARNING! The procedures described on this page require great care and some degree of skill to complete. If proper care is not exercised or you have no idea what you're doing, the possibility of damaging the upgrade CPU and then your computer system is very high. Please understand that you are doing this at your own risk. Do not do this or anything like it if you are not comfortable doing so! Neither I nor Walsh Computer Technology can be held responsible for any of the results, good or bad!
You have been warned. Now, onto the story.
Kingston Technology used to market a nice upgrade for 486-based computers known as the TurboChip. It ran at 133MHz, was based upon an AMD processor, and could give your 486 system quite an impressive performance boost. Unfortunately, Kingston did not decide to use a "real" heatsink and fan setup--they simply glued a fan to the chip and hoped that it would be kept cool enough in operation. The cooling design seems OK as I've run one of these chips in the distributed.net project with no problems at all. However, the fan used is cheap and the bearings will fail at some point, leaving you with a fan that may no longer be able to cool the CPU properly.
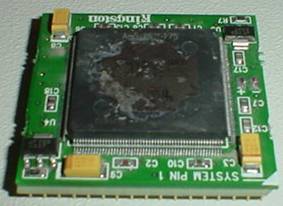
I use one of these chips in a PS/2 Model 85-0XF, and recently that chip's onboard fan started to sound like a lawn mower, indicating that it was in serious trouble. Naturally, I wanted to see if the fan could simply be removed nondestructively and relubricated. (Sometimes putting some *good* oil in these fans can dramatically extend their lifetimes...) I tried to peel the fan from the chip, but it fell apart and left a plastic disc glued solidly on top of the processor. I didn't feel that I could replace the original fan in any acceptable way, so I decided to remove and replace it with something else entirely.
The first problem was getting the plastic disc off of the CPU itself. Kingston must have used some kind of super glue to apply their fan. It was only with time, patience, and an X-Acto knife that I got it to come off. It did leave the CPU looking somewhat scratched up, but that has not affected functionality so far. I expect that this will probably be the most difficult part as the CPU itself is a somewhat delicate SMD package and it takes a considerable amount of force to remove the plastic disc.
When the chip was totally clear of the old "heatsink", I set in to designing another. I did not feel that a conventional 486 heatsink and fan combo could be used as it might hit and/or short out components on the "support board" for the upgrade CPU. I set in to cutting down a passive 486 heatsink (no fan) down to size, but I later found a heatsink that required only a little grinding on the edges to make for a perfect flush fit against the CPU.
Some readers might be wondering why I chose only a passive heatsink. This was for two reasons. Firstly, I didn't have convenient access to a fan with an appropriate size for the sink I found. Secondly, the system this upgrade is installed in (a PS/2 Model 85-0XF) has a tremendous amount of airflow throughout the whole system case. This amount of airflow means that a large amount of fresh cool air is being drawn over the heatsink when the CPU is installed. I also suspect that my heatsink modification is a good deal more effective than the originally installed fan, which merely blew cool air onto the edges of the CPU. You may wish to use a more conventional heatsink with a fan setup in other systems that do not move quite as much air around the system case.
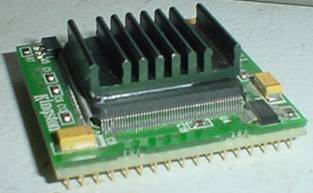
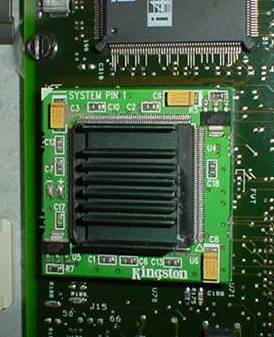
The above picture shows the finished project. As you can see the heatsink is a perfect fit for the CPU. Since fastening the heatsink using a clamp might have been difficult and the CPU is soldered to that board anyway, I simply chose to place a small blob of heatsink compound in the middle of the sink and to super glue the edges of the sink to the chip. I feel this is a perfectly acceptable solution to a potentially difficult problem. Your mileage may vary.