L40SX Hard Disk Removal and Reinstallation
This page will help you safely disassemble your PS/2 Model L40SX so that you can simply look inside, upgrade parts, or specifically, change the hard disk should yours have failed.
WARNING, WARNING, WARNING, DANGER, ETC... Taking apart any laptop is a risk! Parts used are often much smaller and more delicate than those used in a desktop computer. Since many parts are built right into the motherboard, the damage that could be caused by a static discharge is more likely to be fatal to the computer. So--do this at your own risk, make good notes and take your time! IBM's engineers did a good job with the L40 and it is pretty easy to take apart. Just be sure it is safe for you and the computer!
Parts you will need:
Philips and Bladed screwdrivers
An L40SX
Working L40SX starter diskette
Disk manager self-booting diskette for drives over 500MB
Steady Hands
Large open work area with a safe place to store static sensitive parts...
Parts that could be helpful:
2.5" hard disk power adapter for use with a desktop computer
1. Position your L40 in your work area.
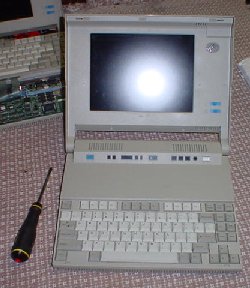
2. Close the lid and turn the L40 over so that the "keyboard end" is facing you. There are three philips screws that will need to be removed.

Protecting each screw is a small plastic insert. The easiest way to remove these is to take your bladed screwdriver and pry up on them at one end. They should pop up and be removable with your fingers afterwards.
3. Turn the machine back over, using care not to grab it by the display. With the machine turned over, push in both display opening buttons firmly and open the display.
IMPORTANT: You MUST push in the display opening tabs firmly or you will pull the keyboard straight out of the unit very quickly. This could damage it.
You can then grab the keyboard by its outer edge and lift it up.
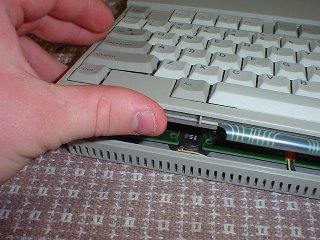
4. Once you get the outer edge of the keyboard up, you can gently lift it out of the back of the machine until the keyboard is mostly free and you can see the connecting cables.
Disconnect the keyboard cables and set the keyboard aside.
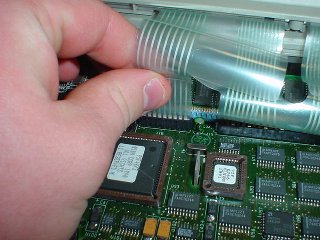
Pull up gently, straight and evenly on the cables so you don't tear them.
5. Disconnect the two ribbon cables leading to the other half of the system cover. Again, do this carefully. These will tear easily if pulled unevenly. You may find it helpful to release the edges of the plastic connectors with a screwdriver.
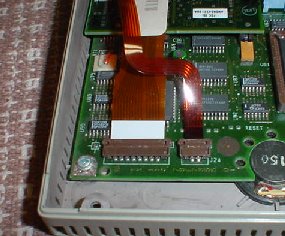
6. Turn the machine around so the rear faces you. Open all three covers. Remove all the screws along the top edge of each port area.

CAUTION: Don't remove any other screws besides the topmost ones. The other screws hold your display panel in place and it is a pain to realign and secure it should you undo the screws.
7. Tilt the display panel all the way back until it stops after removing all the screws in step 6. You're now going to remove the back half of the cover.
It helps to remove the cover from the rear of the machine, working forward. If you work forward to the rear, you will encounter some restraining snaps that are difficult to detach.
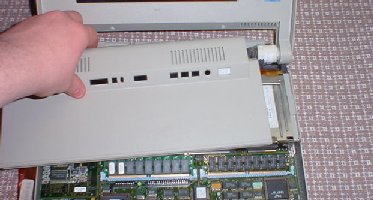
8. All covers over the top of the system should now be removed and you should see something like this:
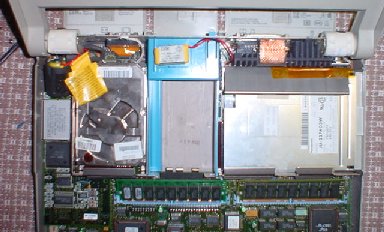
You're now almost ready to remove the hard disk drive and assembly. However, a few more things may have to be done depending on how your L40 is configured.
9. Move the internal battery out of the way. This is the large foam-wrapped, yellow edged cyliner at the left rear of the machine when it is facing you. You will need to do this not only to remove the hard disk but also the optional internal modem if you have one.
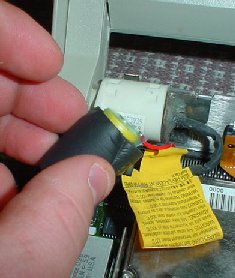
Steps 10 through 12 are for machines with the optional internal modem only.
10. Locate the screw holding the modem in at the upper left hand corner. Loosen it and set it aside.

11. Remove the modem's external cover plate. This can be done carefully with a long fingernail or the bladed screwdriver. You must remove it before the modem will come out.
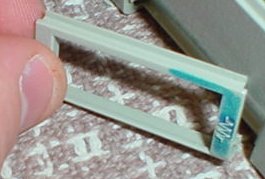
12. Carefully remove the modem card by grasping it at both ends and gently but firmly pulling up. It will be held in by the system board with a fair bit of strength. Set the modem board safely aside for later reinstallation.
13. Remove all memory from the machine. Set it aside in a static-safe location, especially if you are lucky enough to have a rare 8MB SIMM or two as pictured.
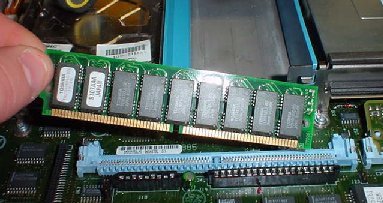
14. Now you're ready to actually remove the hard disk.
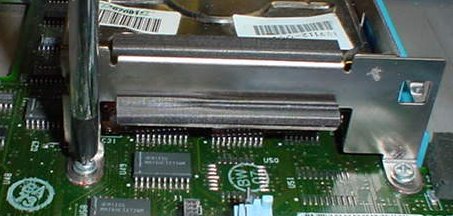
It's held in by two Philips-head screws. Remome them both and you can carefully lift the hard disk mechanism up and out of the machine.
IMPORTANT: As with all the other cables you have removed so far, the hard disk cable is also a thin printed ribbon type. It is rather long and more fragile than the rest of the cables, so treat it with care while lifting the hard disk assembly.
15. With the hard disk lifted up, you can see the ribbon cables connecting it to the motherboard.

16. To actually remove the ribbon cables and completely free the hard disk from the system, take the bladed screwdriver and gently push the connectors holding the ribbon cables open.
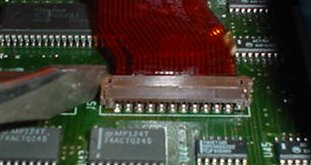
17. You can now remove the hard disk from the system. Removing the hard disk from the mounting cage is easy. Simply cut and remove any copper tape if present around the hard drive. Remove it completely after cutting. (You won't need it again for the new drive, so you can discard it.)
Once the tape is removed, you can unscrew the drive from the cage using a small hex-head screwdriver. The old, broken drive can be removed and the new one secured in the same way as the old one was.
Once the old drive is unscrewed and clear of the cage, you need to transplant the ribbon tape onto the new drive. Carefully place your bladed screwdriver between the cable and connection to the old drive. (Don't just pull on the ribbon, you will tear it in two!) Pry very gently until the connection comes completely apart. You may have to move your screwdriver around to get it done.
17a. If you desire to load software on or format the new drive prior to reinstalling it in the cage (though if it is over 500MB you should also install a disk manager program so the L40 can use the drive) a laptop to desktop IDE converter could come in handy.
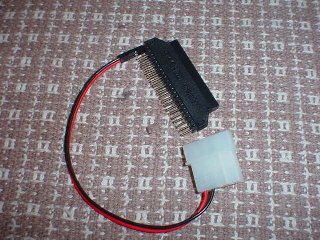
18. Orient the drive and cage correctly above the machine as they will go in to be reinstalled. Reconnect the cables to the motherboard as they came off.
To make this vastly easier, open the latches on the motherboard connectors if they have come undone. When you insert the ribbon into a connector, the connector's tab will flip upward slightly, letting you know that the cable is in place and the connector is ready to be shut.

You can see in the picture above that one connection (on the right) has been locked down. The other is ready to be locked down.
19. Lock down each connector (one at a time) by simply pressing the raised tab up and sliding it down with your finger pressing against it.
Congratulations! Your new hard disk is now reinstalled. Now it is time to reassemble your machine.
20. Reassembly is nearly the exact opposite of disassembly. However, there are a few things to note:
* If you have an internal modem, it will be somewhat difficult to align after reinstalling the hard disk cage. You may need to make several attempts at doing this. Don't just leave the modem out especially if you don't have a proper blank to cover the hole with! Things might get into the machine that way and short it out.
* Be sure to put the big battery exactly back as you found it. Press it down as best you can but don't strain the contacts too hard.
* Reinstall the rear back cover by starting at the rear of the machine. Make sure the positioning is correct so the screw "holes" match up with their respective locations in the sheet metal at the rear of the machine by the ports.
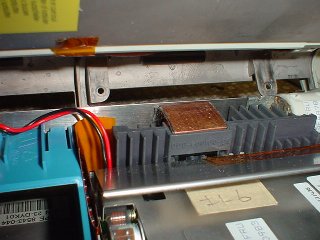
Don't hesitate to apply firm pressure on the front of the rear half of the machine's cover to snap it into place. Just be sure it's going down evenly everywhere with a minimum of force.

(You can see one of the "snaps" above. It is right above the third chip on the SIMM.)
*Once the back cover is in place, position the keyboard over it and connect the keyboard cables. You don't really have to worry that much about getting the little plastic "helpers" back in the sockets so long as the main connectors are in there correctly.
* When screwing the back cover on, it is possible that you will have to press down firmly on the back of the rear half of the machine's cover to make the screw holes line up. While it might feel like 3 or 4 more hands would be helpful, a magnetized screwdriver will alleviate most of that. It is also possible that the little "walls" between port doors will have to be pressed back together. Do this after everything is screwed down in the back.
*To screw the keyboard back in, insert the back end first followed by the front end. Be sure no cables are getting snagged in the front end. Once the keyboard is in, shut the display and hold it while turning the machine over. Screw in all three keyboard screws and replace the little plastic plugs.
You're done with the reassembly. Now for a few words on getting the software side of things going.
* Have the L40 starter diskette handy after reassembly. You may need it to tell the machine abou the new hard disk.
* If your drive is over 500~528MB in size, have a disk manager program available, preferably one on a bootable diskette that runs in DOS. Most all hard disk makers provide this software absolutely free of charge for your drive. You may have to hunt to find a DOS version as opposed to one that runs under an already operating system like Windows, but it can be done. Fujitsu drives make this task the most work, but it is possible even there.
* If the machine still produces errors after the hard disk reinstallation, you may want to go over your connections and be sure they are tight. This is not really a problem in the L40 though. The connectors (though small) are easy to use and you will "get the hang of it" shortly. If you can't get rid of the errors, it is reasonable to suspect that some part of the machine has gone bad.
Copyright ©2003-2005 by Walsh Computer Technology. All rights reserved.