|
Power Management: Suspend/resume An application is suspended by closing the clamshell leaving the power switch on. When the clamshell is opened, the application resumes at the point it was suspended. During suspension system components are automatically powered off except for the real time clock and application memory. The system can be set to resume at a specific time of day. Internal backup battery Change the battery pack without disrupting the application. Trickle Charge trickle recharging occurs during AC operation. Manual vs. Automatic Mode You can use the "A-M" switch on the left side of the top cover to select manual or automatic mode. In automatic mode, the hardware initiates low clock speed operation during idle periods. In manual mode, the processor runs at the default clock speed set by the user when the system is configured. The clock speed settings are 20, 10, and 5MHz. Sleep mode. Sleep mode conserves battery power during idle times between clock cycles and key strokes by putting system components in an idle state resulting in low power usage. Sleep mode is not operational when an external display is attached. This function is exploited by DOS and OS/2 Application, operational, operating system, and environmental characteristics will affect actual battery duration between recharges. 8543 Power Trivia Peter has some horrid flashbacks and recalls: Normally there is one cell of the whole block on the last leg. I disposed a large number of L40SX battery packs when my office moved in '96. Today I'm a bit sorry about that - I use to part out the case and fill it with "industrial standard" cells of a particular size. The main problems:
IBM had various ECAs on the L40: LCD brightness, battery
lifetime, Serial and Parallel port power, battery lifetime again, exploding
battery chargers, isolation problems in the DC/DC converter circuit with
fire hazard, shot fuses in charger circuit, runtime on batteries and how
to save energy and extend the runtime on batteries. (These were the ones
I recall after the many years ...)
Battery PN 79F0197, FRU 79F0994 Ni-Cd10.8v, 2.4 AH Testing the Rechargeable Battery
4. Using the AC adapter, apply external power to the computer.
Make sure that a charge arrow appears in the system-status display.
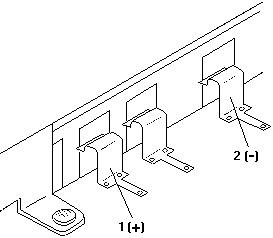
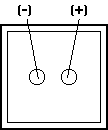
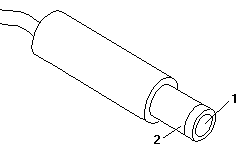
1 (+) and 2 (-). If the voltage is not greater than the one
measured in Step 3, replace the AC adapter. If the voltage is greater than
the one measured in Step 3, go to the next step.
Pin Voltage (Vdc)
If the voltage is not correct, the rechargeable battery is discharged
or defective. If the voltage is correct, go to the next step.
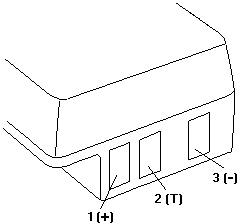
8. Using a low-power ohm meter, measure the resistance at the battery
terminals between 2 (T) and 3 (-). The resistance must be 4 kilohms to
30 kilohms. If the resistance is out of range, replace the rechargeable
battery.
Backup Battery PN 79F0986 Panasonic Lithium BR-2/3A 3V Testing the Backup Battery
Pin Voltage (Vdc)
If the voltage is not correct, the backup battery is discharged by a
short circuit or is defective.
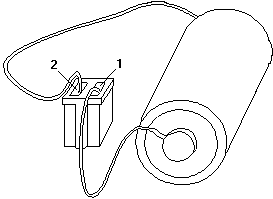
Stand-by Battery PN 65F0225 Ni-Cd DC 3.6v 45mAH Panasonic KRM 11/16 CF. Goes on top of the blue battery shield in the little "fence" on top. Testing the Standby Battery
1. Remove the keyboard and the top cover.
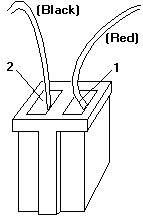
Pin Voltage (Vdc)
If the voltage is correct, perform the failing operation with a fully-charged
standby battery to isolate the problem.
4. Measure the output voltage at the connector on the system board.
If the voltage is higher than measured in Step 3, the standby battery
is discharged or is defective.
Quick Charger PN 79F0193 FRU 79F0995 Input- 100-240v ac, 50/60Hz 0.5-0.3A, 35W Output 13v 1.3A There is no deep discharge function built into the Quick charger. Testing the Quick Charger
AC Adapter 79F0993 Car Adapter 06G9206 Testing the AC Adapter
Pin Voltage (Vdc)
If the voltage is not correct, replace the AC adapter.
The A/C adapter plugged into the L40, but the battery icons
indicate that the battery is still being drained. The A/C adapter
is plugged into both the wall and the L40. Do I have a bad battery?
Peter Sez:
Aron replies
The L40's power use falls within the Energy Star's guidelines
When I get my L40 back together, I'll have to check these out- Idle.exe Pm_bios.386 Ps2.exe Pwrmgmt.sys |
